17 Simple Christmas Nails That Still Look Festive
The mistake I see with simple Christmas nails is going so plain that the Christmas part disappears completely. A bare nude manicure is neat, but it is not festive. These 17 simple christmas nails keep the base quiet and give every nail one small, deliberate detail.
December mixes office days, errands and family dinners, so my festive nails have to behave in all three. I keep the base quiet, nude or sheer, and let one small detail per nail do the Christmas talking.

Quick Picks: Match the Look to Your December
Short on deciding time? Start here. These simple Christmas nail designs sort themselves by the day you are dressing for.
- Office-safe and quiet: look 7, one emerald dot on nude. It reads as a plain manicure until someone looks twice.
- Fastest home option: look 2, a gold tip with one red dot. Two steps, no drying marathon.
- Family dinner, still subtle: look 9, blush with a gold micro-tip, soft in candlelight.
- A small lift for parties: look 12, velvet red with gold dots, festive but grown-up.
- First try at nail art: look 1, bubble dots. Dots forgive shaky hands.
1. Champagne Bubble Dots on Sheer Nude
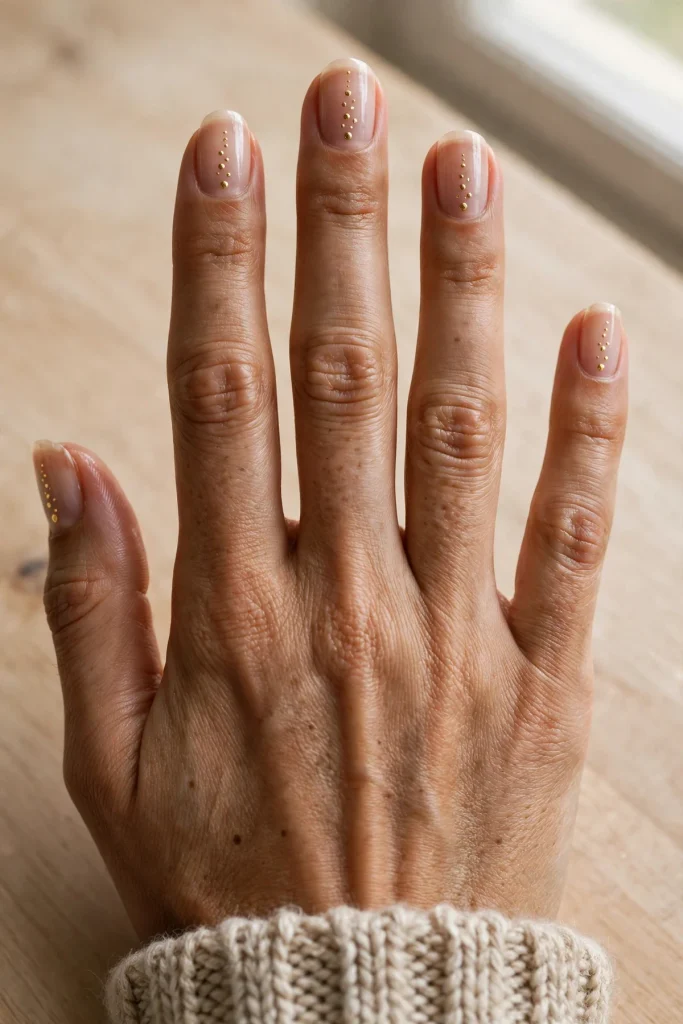
Tiny gold dots rise from the base of each nail and thin out toward the tip, like bubbles in a glass. On a sheer nude base the effect is soft enough for work and still clearly a celebration detail. Tip: use the head of a pin for the dots, biggest at the base, smallest near the tip.
Quick facts: short squoval · about 30 minutes · glossy polish finish · Easy · DIY: Yes
2. Gold French Tip, One Red Dot
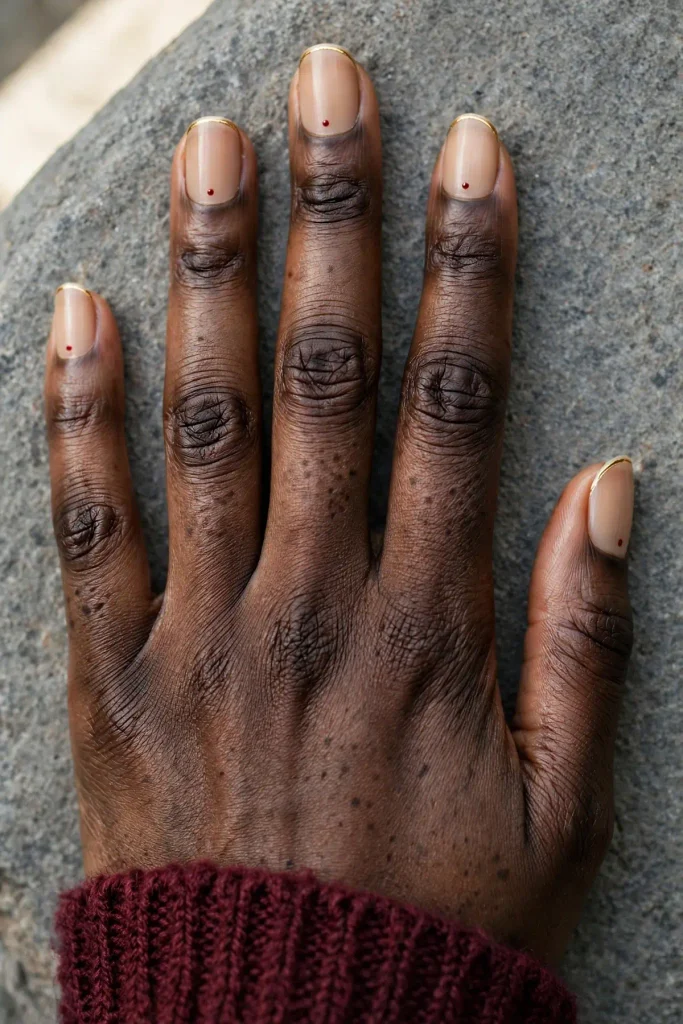
The slip with French tips at Christmas is adding glitter, art and color until the simple part is gone. The fix is one change only: paint the tip line gold instead of white, then add a single small red dot at the center of the base. It takes minutes and reads festive from across a table.
Quick facts: short square · about 35 minutes · glossy polish finish · Easy · DIY: Yes
3. A Tiny Silver Comet on Blush

This one suits you if you like your festive hint to feel like a secret. One small silver dot near the tip of each blush nail trails a short, fading tail behind it. The shape is simple, a dot and a dragged line, and it stays subtle in daylight.
Quick facts: short oval · about 30 minutes · glossy polish finish · Easy · DIY: Yes
4. One Pearl at the Cuticle

A single tiny pearl sits at the center of the cuticle on a milky pink nail. That is the whole design, and it is enough: the pearl catches light whenever your hands move. This is a salon look, because the pearl is fixed with gel so it survives hand washing and typing.
Quick facts: short almond · about 40 minutes in salon · glossy gel finish · Medium · DIY: No, needs gel kit
5. A Single Red Pinstripe
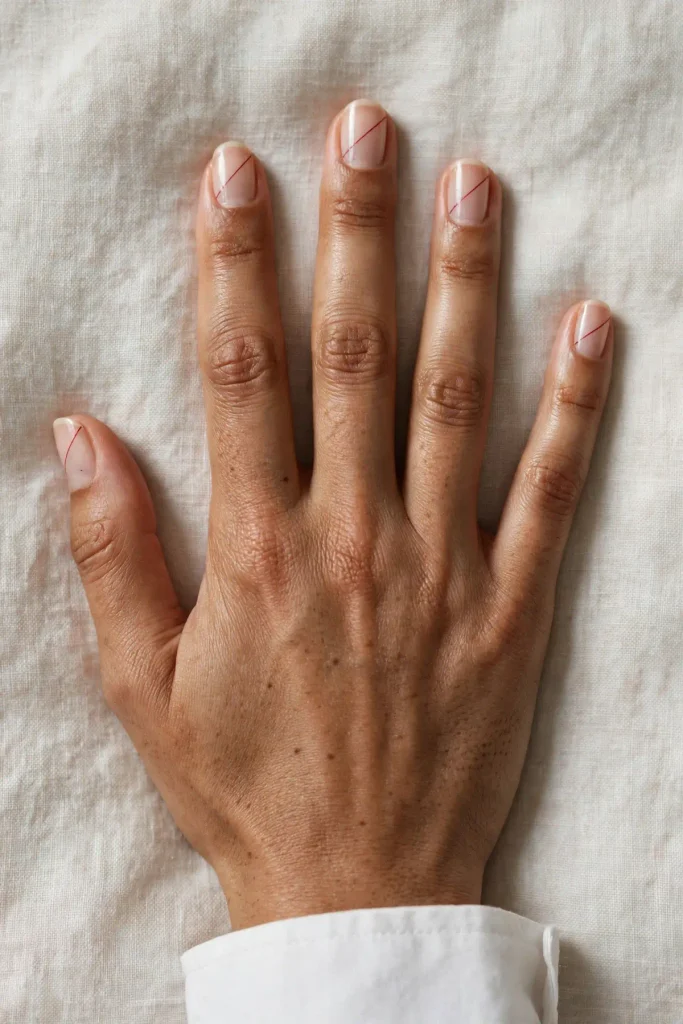
One fine red line, drawn diagonally across a clear nude nail, does more than a busy pattern here. Do it in three calm steps:
- Paint the nude base and let it dry fully.
- Drag a striping brush once, corner to corner, without stopping.
- Seal with a glossy top coat to level the line.
Quick facts: short squoval · about 30 minutes · glossy polish finish · Easy · DIY: Yes
6. Gold Foil Flecks on Milky White
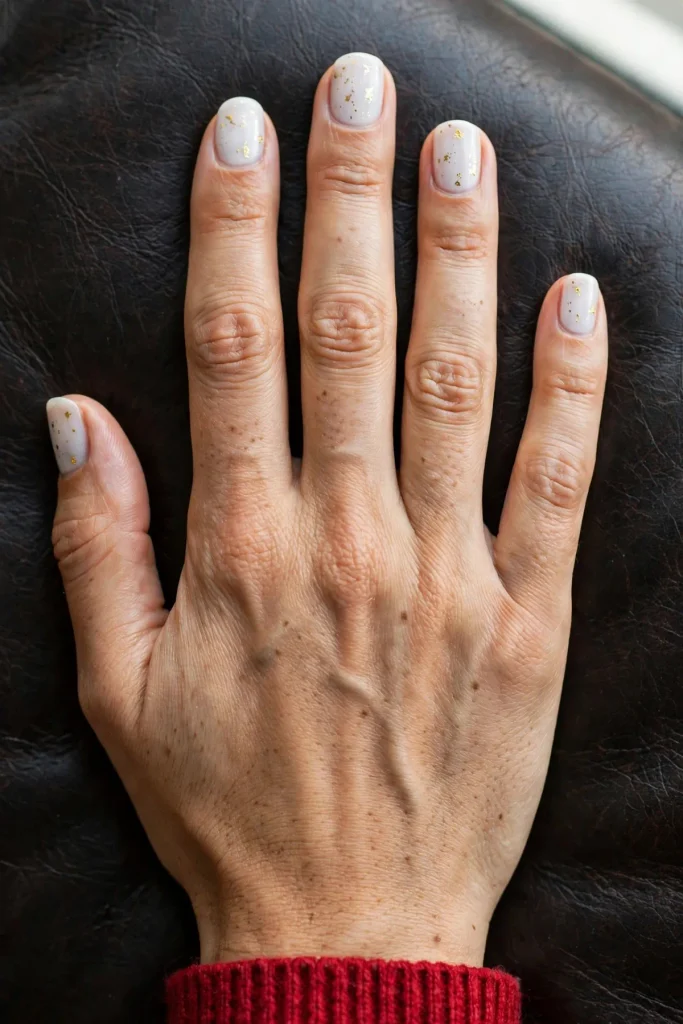
Small pieces of gold foil rest under a milky white layer, showing through like light through frosted glass. The flecks are irregular on purpose, so no two nails match and small mistakes stay invisible.
“Foil is the shortcut I trust most in December. It catches the same light as glitter, and it comes off without a fight.”
Quick facts: short square · about 35 minutes · glossy polish finish · Easy · DIY: Yes
7. One Emerald Dot, Nothing Else

The most common way to spoil this look is adding a second detail “just in case”, a line here, a dot there. Resist it. One deep emerald dot at the exact center of a sheer nude nail is the design, and its confidence is the point. It suits short nails and office dress codes alike.
Quick facts: short oval · about 25 minutes · glossy polish finish · Easy · DIY: Yes
8. Silver Glitter Fade at the Tips

This suits you if your nails are short and you want the festive part kept far from the cuticle. Fine silver glitter gathers at the tips of a pale grey nail and fades down to almost nothing. Grown-out edges stay hidden, which makes this a kind pick for a busy fortnight.
Quick facts: short squoval · about 40 minutes · glossy polish finish · Medium · DIY: Yes
Halfway note: everything so far is a one-detail design. The looks ahead keep the same rule, with a few warmer colors and two more salon finishes for party weeks.
9. Gold Micro-Tip on Blush Pink
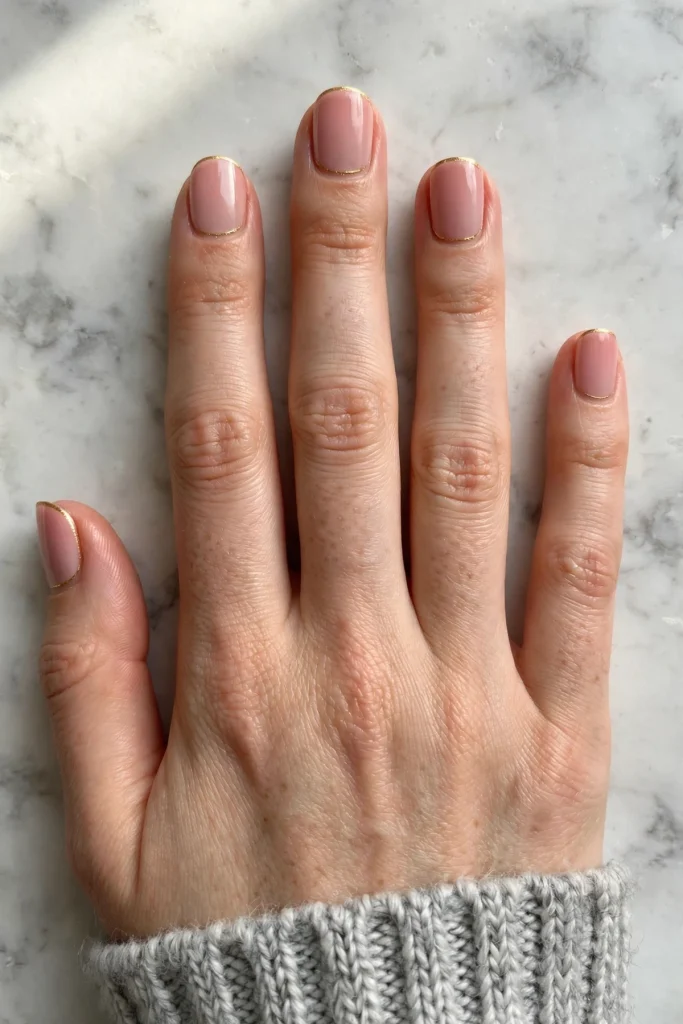
A hair-thin gold line follows the very edge of a blush pink nail. It is a short entry because the idea is short: a French tip reduced to a whisper. In candlelight the line glints; in office light it nearly disappears.
Quick facts: short square · about 30 minutes · glossy polish finish · Easy · DIY: Yes
10. One Gold Dot on Deep Green

Deep green carries the Christmas color; one gold dot at the cuticle carries the detail. Build it in three steps:
- Paint two thin coats of the green and let them dry.
- Place one gold dot at the center of the cuticle with a dotting tool.
- Top with gloss so the dot sits like a tiny stud.
Quick facts: short oval · about 30 minutes · glossy polish finish · Easy · DIY: Yes
11. A Fine Gold Frame Around the Nail

A thin gold line traces the edge of an ivory nail, framing it like a picture. The middle stays empty, which is what keeps it elegant. Tip: trace the sides first and the tip last, and rest your painting hand flat on the table to steady the line.
Quick facts: short almond · about 45 minutes · glossy polish finish · Medium · DIY: Yes
12. Velvet Red With Three Gold Dots
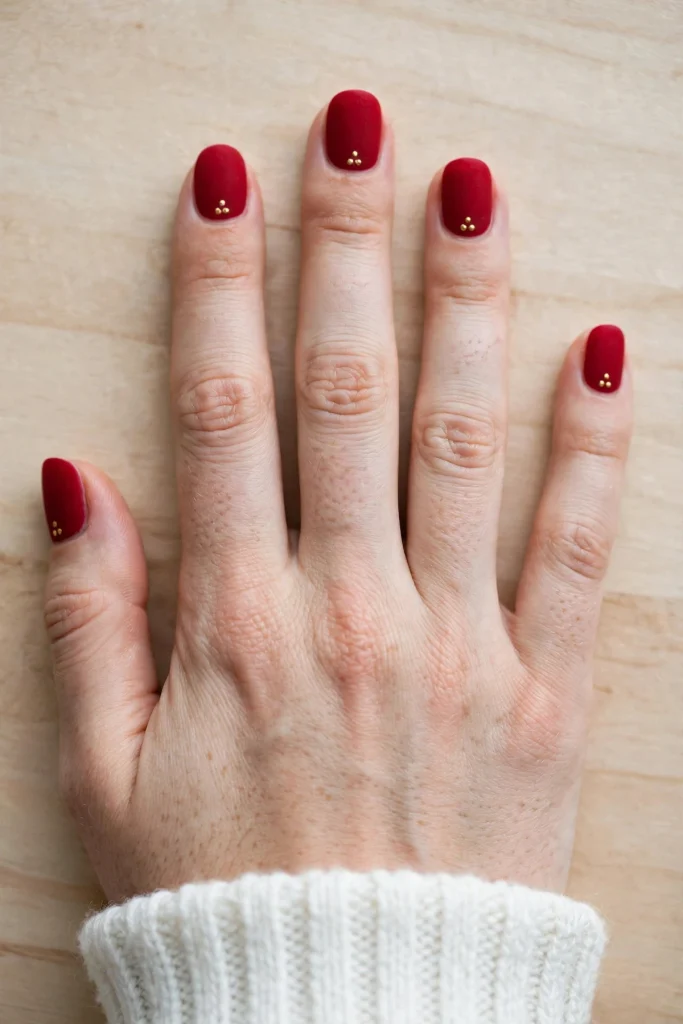
Velvet red is the loudest color in this list, so the art stays tiny: three small gold dots clustered near the base of each matte nail. The usual mistake is choosing a glossy top here, which flattens the velvet effect. This one is a salon gel finish, booked ahead for party week.
Quick facts: medium oval · about 50 minutes in salon · matte velvet gel finish · Medium · DIY: No, needs gel kit
13. Micro French, One Silver Dot

A micro French suits you if classic tips feel too wide for your nail beds. The white line is kept very thin, and one silver dot sits just under it, like a tiny bauble hanging from the edge.
“A micro French is judged at the smile line. Thin, even and low is what makes it look expensive, not white and wide.”
Quick facts: short squoval · about 35 minutes · glossy polish finish · Easy · DIY: Yes
14. A Gold Chain Line on Taupe
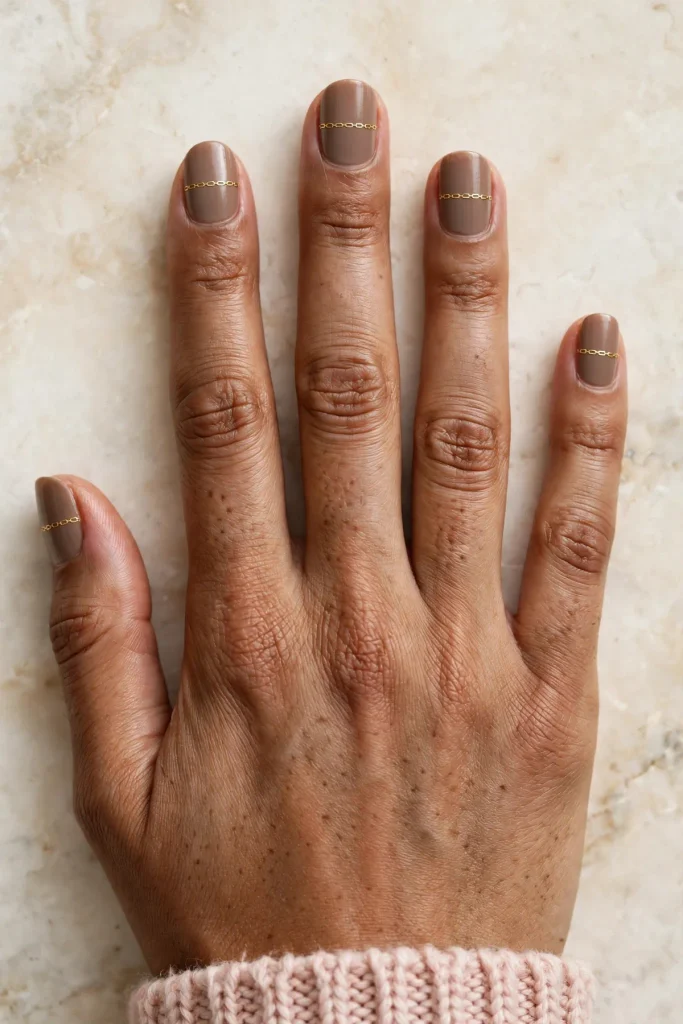
One fine gold line crosses the middle of a warm taupe nail, drawn as tiny linked dashes so it reads as a delicate chain. It is a quiet design with a jewelry feel, and it pairs well with plain gold rings. Keep the dashes even and the line single.
Quick facts: short square · about 40 minutes · glossy polish finish · Medium · DIY: Yes
15. Red Stitch Dashes Down the Middle

A dashed red line runs down the center of a soft white nail, like stitching on a handmade gift. Do it in three steps:
- Paint the soft white base and let it dry.
- Dip a fine brush and press short dashes in a straight line, lifting between each.
- Finish with gloss once the dashes are fully dry, so they do not drag.
Quick facts: short oval · about 35 minutes · glossy polish finish · Easy · DIY: Yes
16. Gold Glitter Arc at the Cuticle

Fine gold glitter follows the curve of the cuticle on a deep burgundy nail, a small arc that frames the base. The rest of the nail stays plain and dark. Tip: wipe the brush almost dry before the arc, so the glitter lands in a line instead of a blob.
Quick facts: short squoval · about 40 minutes · glossy polish finish · Medium · DIY: Yes
17. Tiny White Clouds on Pale Blue

The mistake with pale blue is letting it read as a summer color. The fix is two tiny white cloud puffs per nail, soft and round, which turn the blue into a winter sky. Keep the clouds small and high on the nail, and leave most of the blue empty.
Quick facts: short round · about 35 minutes · glossy polish finish · Easy · DIY: Yes
What to Tell Your Nail Tech So Simple Stays Simple
Bring one photo, not a collage. Simple designs fail in salons when ten references pull in ten directions, so pick the single look you want and show the exact nail it sits on. Name the base first (nude, sheer pink, milky white), then the detail, then where it sits: tip, center or cuticle.
Say the size out loud. Words like “tiny” and “small” mean different things at a nail desk, so point to the detail in the photo and agree its size before the brush comes out. For the pearl (look 4) and the velvet finish (look 12), book them as gel services, and ask the tech to patch-test gel products on one nail if your skin is reactive.
The Easiest Eight, at a Glance
| Look | Level | DIY | Time |
|---|---|---|---|
| 7. Emerald dot | Easy | Yes | 25 min |
| 1. Bubble dots | Easy | Yes | 30 min |
| 3. Silver comet | Easy | Yes | 30 min |
| 10. Gold dot on green | Easy | Yes | 30 min |
| 2. Gold tip, red dot | Easy | Yes | 35 min |
| 6. Foil flecks | Easy | Yes | 35 min |
| 13. Micro French | Easy | Yes | 35 min |
| 9. Gold micro-tip | Easy | Yes | 30 min |
Time and Money: Planning a Simple Set
Simple is cheaper in time before it is cheaper in money. Most looks in this list sit between 25 and 45 minutes of painting, which means a salon visit can fit a lunch break, and a home session fits one film. The two gel looks (4 and 12) take longer and cost more than polish looks, because gel services include curing and careful finishing.
Salons usually price simple art as a small add-on per set rather than per nail, but policies differ, so ask when you book. At home, the whole list runs on a short kit: a nude base, one red, one green, a gold, a dotting tool, a fine brush and a good top coat. That kit covers many Decembers, which is where the real saving sits.
At Home: Which of These You Can Honestly Do Yourself
Fifteen of the seventeen are regular polish, and most easy Christmas nails ideas lists overpromise here, so let me be plain: the dot designs (1, 7, 10) are genuinely beginner-friendly. The line designs (5, 11, 14, 15) need a steady hand and one practice nail. The glitter fade (8) and foil (6) hide mistakes well and suit first-timers too.
Two looks stay at the salon: the pearl (4) and the velvet red (12), because both need a gel kit and a lamp. If you do use home gel for other designs, patch-test on one nail first, keep gel off your skin, and do not peel cured gel off; book a professional removal instead. For polish, a base coat under every design keeps reds and greens from staining, and a fresh top coat every few days keeps simple art looking new.
Small Christmas Details That Make Simple Nails Stand Out
Minimalist Christmas nails live or die on detail choice. The detail has to say “holiday” in one glance, at one centimeter wide. Four families of detail do this job reliably, and they are the ones worth learning.
- Tiny stars and snowflakes: a single small star or one delicate snowflake, kept to a few fine lines, reads as winter even on a bare nude nail. Scale is the skill: draw it smaller than feels safe, because details grow visually once the top coat goes on.
- Fine candy-cane stripes: one or two hair-thin red stripes, straight or diagonal, borrow the candy cane’s colors without drawing the whole sweet. On a white or nude base, a single stripe is often enough.
- Miniature bows: a tiny bow outline at the cuticle or tip adds a gift-wrapped feel. Keep it as an outline rather than a filled shape, so it stays light on short nails.
- Dots, pearls and foil: the dot family from this list. A single dot in a festive color, one pearl, or a few foil flecks give the same signal with the least skill needed, which is why beginners start here.
Placement matters as much as the detail itself. One detail, placed once, in the same spot on every nail is what separates “simple and festive” from “unfinished”. Repeat the spot, trust the repeat, and stop.
Questions About Simple Christmas Nails
Will a simple design still look Christmassy enough?
Yes, if the detail uses a festive signal: a Christmas color, a metallic, or a winter shape. The looks here work because the base stays quiet while one detail carries the theme on every nail. A plain manicure with no detail at all is the version that stops reading as festive.
How long does a simple Christmas manicure last?
Regular polish looks usually last several days to a week with a base coat and top coat, and less if your hands are in water often. The two gel looks (4 and 12) usually last longer, often two to three weeks. A fresh layer of top coat midweek is the cheapest life-extender for polish.
Can I do these designs on very short nails?
Yes, and simple designs suit short nails better than scenes do. Pick the single-dot looks (7 and 10) or the micro-tip (9), and keep the detail near the tip or cuticle rather than the center. Simple Christmas nails for women with short nail beds work well when the detail is small and the base is sheer.
Do I need gel polish for simple Christmas nails?
No, most of this list is regular polish, and only looks 4 and 12 need a gel kit. Gel gives a longer wear and fixes charms like the pearl, but it also needs careful use: patch-test first, keep it off the skin, and have it removed properly rather than peeled.
How do I take glitter and foil designs off at home?
Soak a cotton pad in remover, rest it on the nail for a short while, then wipe gently and repeat instead of scrubbing. Foil flecks (look 6) lift easily this way, and glitter fades (look 8) come off with patience. Wash and oil your nails after, because remover dries them out.